Introduction to DIY Wall Repair
Wall damage is a common issue in many homes, ranging from small holes caused by nails to unsightly cracks that develop over time. For beginners, the thought of repairing these imperfections can seem daunting, but the good news is that fixing small holes and cracks is often straightforward and budget-friendly. With the right approach, anyone can restore their walls to a smooth, flawless finish without needing professional help. This article offers a practical guide to easy DIY wall repair, helping you tackle minor wall damage confidently.
Identifying Common Wall Damage Types
Small Holes: Causes and Characteristics
Small holes in walls typically result from everyday activities such as hanging pictures, shelving, or accidental impacts. These holes are usually less than an inch in diameter but can create an unsightly appearance, particularly on painted drywall. Understanding the size and cause of these holes is essential because it dictates the repair method. For example, a tiny nail hole will require less preparation than a larger hole left by wall anchors. These minor imperfections do not usually compromise the wall’s structure but need proper attention to prevent further deterioration.
Cracks: Understanding Their Formation
Cracks in walls develop due to various factors including building settling, temperature changes, or moisture issues. Unlike holes, cracks can vary widely in size and depth, and some may signal underlying structural concerns if they are large or growing rapidly. Often, cracks appear along drywall joints or corners as the home shifts slightly over time. Identifying whether a crack is superficial or indicative of a bigger problem is crucial before beginning repairs. For most minor cracks, filling and reinforcing can restore the wall effectively.
Watch the Tutorial
Essential Tools and Materials for Wall Repair
Before starting repairs, gathering the right tools and materials can make the process much smoother. Common essentials include spackling compound or joint filler, a putty knife, fine-grit sandpaper (typically 120–150 grit), a clean rag, and paint that matches the existing wall color. For medium-sized holes, self-adhesive mesh patches are helpful, while for cracks, reinforcing tape might be necessary. Having these items on hand ensures you can properly prepare, fill, smooth, and finish your wall repairs without interruption.
Step-by-Step Guide to Fixing Small Holes
Preparation and Cleaning
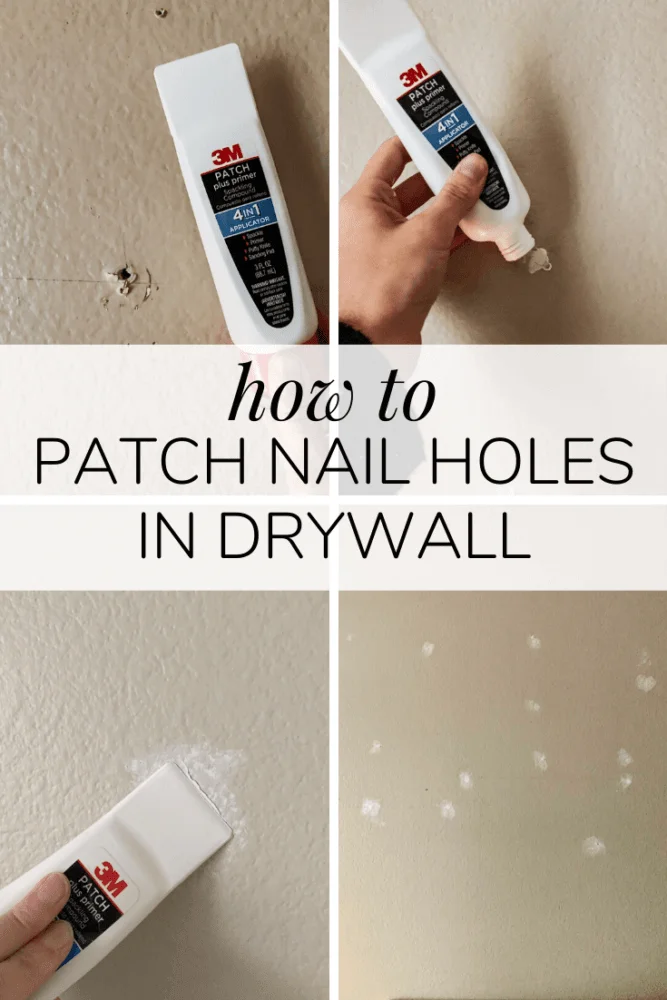
The first step in repairing small holes is to prepare the area correctly. Lightly sanding around the hole with fine-grit sandpaper removes rough edges and helps the spackling compound adhere better. It’s essential not to skip this step as rough edges or dust can lead to uneven surfaces and poor adhesion. After sanding, wipe away dust thoroughly with a rag to ensure the surface is clean before applying any filler. Proper preparation is the foundation for a professional-looking repair.
Applying Spackle or Filler
When applying spackle or filler, use a putty knife to spread a thin, feathered layer over the hole. It’s important to avoid applying thick layers as they tend to dry unevenly and can crack. Feathering the edges allows the compound to blend seamlessly into the surrounding drywall, making the repair less noticeable once painted. For medium-sized holes, applying a self-adhesive mesh patch cut about one inch larger than the hole on all sides provides additional support beneath the filler. Allow the compound to dry fully, which usually takes between 30 and 60 minutes, before proceeding to sanding.
Sanding and Smoothing
After the filler has dried, gently sand the repaired area using circular motions. This technique helps avoid oversanding, which can expose the drywall paper and create an uneven surface. If the patched area still shows imperfections after the first sanding, applying a second thin coat of compound can help achieve a smoother finish. Once you are satisfied with the surface smoothness, clean off any dust again to prepare for painting.
Painting for a Seamless Finish
Painting the repaired spot last ensures that the patch blends perfectly with the existing wall color. Use a paint that matches your wall and apply it with a brush or small roller. Feather the paint edges slightly to avoid harsh lines that would draw attention to the repaired area. Depending on the paint type and wall condition, one or two coats may be needed for complete coverage. Once dry, your repaired wall should look as good as new.
How to Repair Cracks: Techniques and Tips
Assessing Crack Severity
Before repairing cracks, it is important to determine their severity. Hairline cracks and small surface cracks typically indicate normal drying or settling and can be repaired with simple filling methods. However, wider or expanding cracks might suggest structural issues, requiring professional assessment. Evaluating the crack helps decide whether a quick fix is sufficient or if more extensive measures are necessary to prevent future damage.
Filling and Reinforcing Cracks
Once you determine a crack is minor, cleaning the crack edges and lightly sanding the area improves adhesion for fillers or patching compounds. For added durability, especially on larger cracks, embedding reinforcing tape over the crack before applying filler helps prevent the crack from reappearing. Apply the filler carefully in thin layers, feathering out the edges for a smooth integration. Allow each layer to dry fully and sand gently before painting to complete the repair.
Preventative Measures for Future Damage
Preventing cracks from recurring involves addressing underlying factors like humidity, temperature fluctuations, or structural settling. Using controlled heating and cooling, maintaining consistent indoor humidity levels, and avoiding excessive wall impact can reduce stress on drywall surfaces. For exterior walls, ensuring proper sealing and moisture control is also critical. Taking these preventive steps helps maintain the integrity of your walls long-term.
Cost and Time Estimates for DIY Wall Repairs
One of the key benefits of DIY wall repair is its affordability and efficiency. Small hole repairs typically require less than an hour from start to finish, with minor costs for spackle, sandpaper, and paint. Total expenses usually remain under $20 for common repair kits. Repairing cracks might take additional time depending on severity, potentially requiring multiple coats and drying periods over several hours or days. Overall, DIY materials and labor costs are minimal compared to professional services, making these projects accessible for most homeowners.
Common Mistakes to Avoid When Repairing Walls
Several mistakes can compromise the quality of your wall repairs if not avoided. Failing to sand around the hole before applying spackle often results in poor adhesion and uneven results. Applying spackle too thickly rather than in thin, feathered layers can cause lumps or cracking as it dries. Another frequent error is not letting the compound dry fully before sanding, leading to a tacky or uneven finish that requires rework. Oversanding is also common, which can damage drywall paper and worsen the appearance. Using a patch that is unnecessarily large for small holes may complicate the repair process and produce messy results. Lastly, when dealing with stubborn wall anchors, aggressive removal attempts can damage the drywall; pushing anchors gently into the wall cavity is a safer technique to prevent additional damage.
Conclusion: Empowering Beginners for Successful Wall Repairs
Repairing small holes and cracks in walls might seem intimidating at first, but with a clear understanding of the causes, proper preparation, and careful execution, beginners can achieve professional-looking results. Awareness of common pitfalls and preventive practices further ensures lasting repairs and a fresh, clean wall surface. By following straightforward steps, anyone can confidently restore their walls, enhance their home’s appearance, and save money on costly repairs. Empower yourself with these simple DIY techniques to maintain and beautify your living space.

