Understanding Basement Waterproofing
Why Waterproofing is Essential for Basements
Basements are often the most vulnerable part of your home when it comes to water damage. Because they are partially or fully underground, basement walls are constantly exposed to moisture from the soil around them. Without proper waterproofing, water can seep through cracks or porous surfaces, leading to dampness, mold growth, and structural problems. Waterproofing your basement walls not only protects your home’s foundation but also creates a healthier living environment by preventing the musty smells and health hazards associated with mold.
Common Causes of Basement Water Damage and Mold
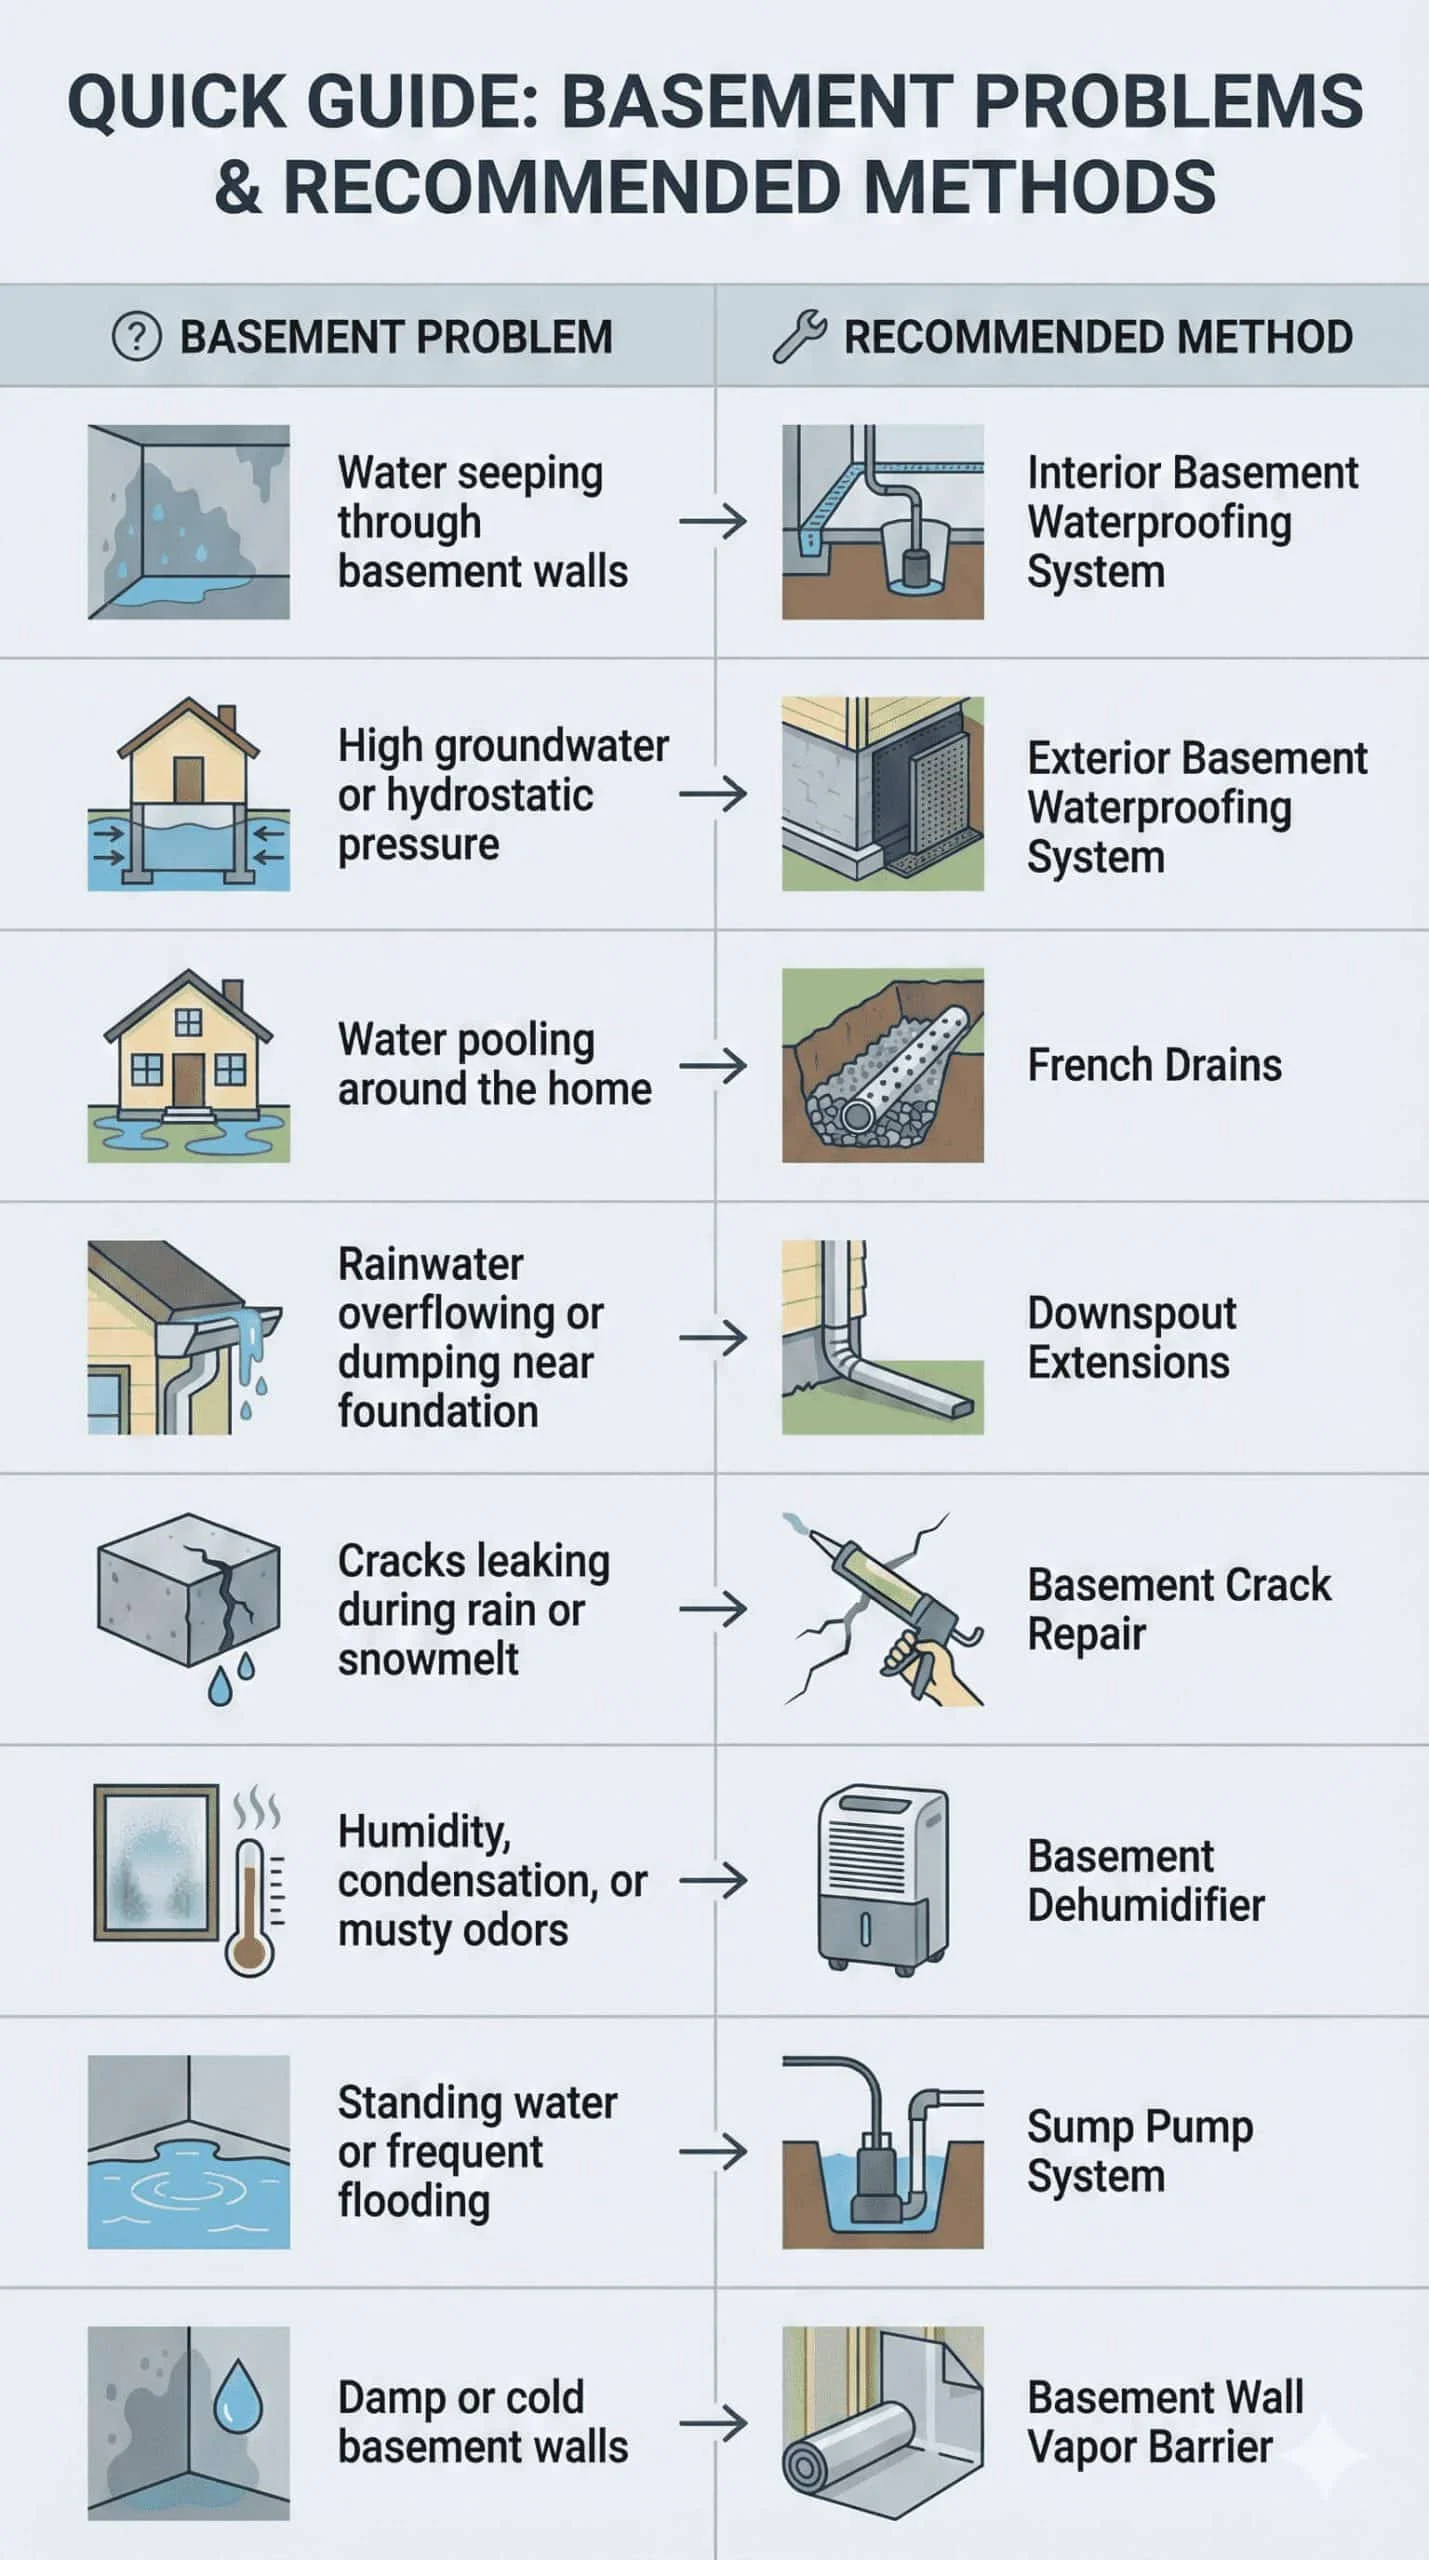
Understanding where the moisture comes from is the first step in addressing basement water damage. Common causes include poor exterior drainage, cracks in foundation walls, clogged gutters, and a high water table. When water accumulates outside the basement walls, it exerts pressure, sometimes forcing moisture inside. This persistent dampness invites mold spores, which thrive in dark, moist environments. Over time, untreated water infiltration can damage your walls, flooring, and belongings, making waterproofing an essential defense.
Assessing Your Basement for Waterproofing Needs
Identifying Signs of Moisture and Mold
Before beginning any waterproofing project, take the time to thoroughly assess your basement. Look for obvious signs like water stains, discoloration, or peeling paint on the walls. You might also notice a musty odor or visible mold patches, especially in corners or near plumbing fixtures. Sometimes, walls can feel damp to the touch or efflorescence—white, powdery residue caused by salt deposits—may be present. Catching these signs early can help you tailor your waterproofing efforts effectively.
Watch the Tutorial
Tools and Materials Needed for Inspection
While no complex tools are necessary for a basic moisture inspection, a flashlight and a moisture meter can be particularly helpful. The flashlight allows you to carefully examine dark corners and cracks. Moisture meters, available at most hardware stores, give a more precise reading of moisture levels in your walls and floors. Additionally, having a notebook to record findings will help you track areas of concern and plan repairs. This preparation ensures your waterproofing work targets the problem areas.
Step-by-Step Guide to DIY Basement Wall Waterproofing
Preparing the Walls and Surface Cleaning
Preparation is key to any successful waterproofing job. Start by cleaning your basement walls thoroughly. Remove any dirt, dust, and loose paint or plaster with a stiff brush or power washer if accessible. It’s also critical to repair cracks or damaged areas using hydraulic cement or a suitable patching compound. Clean and smooth surfaces allow waterproofing products to adhere effectively. Reliable surface preparation lays the groundwork for a lasting moisture barrier.
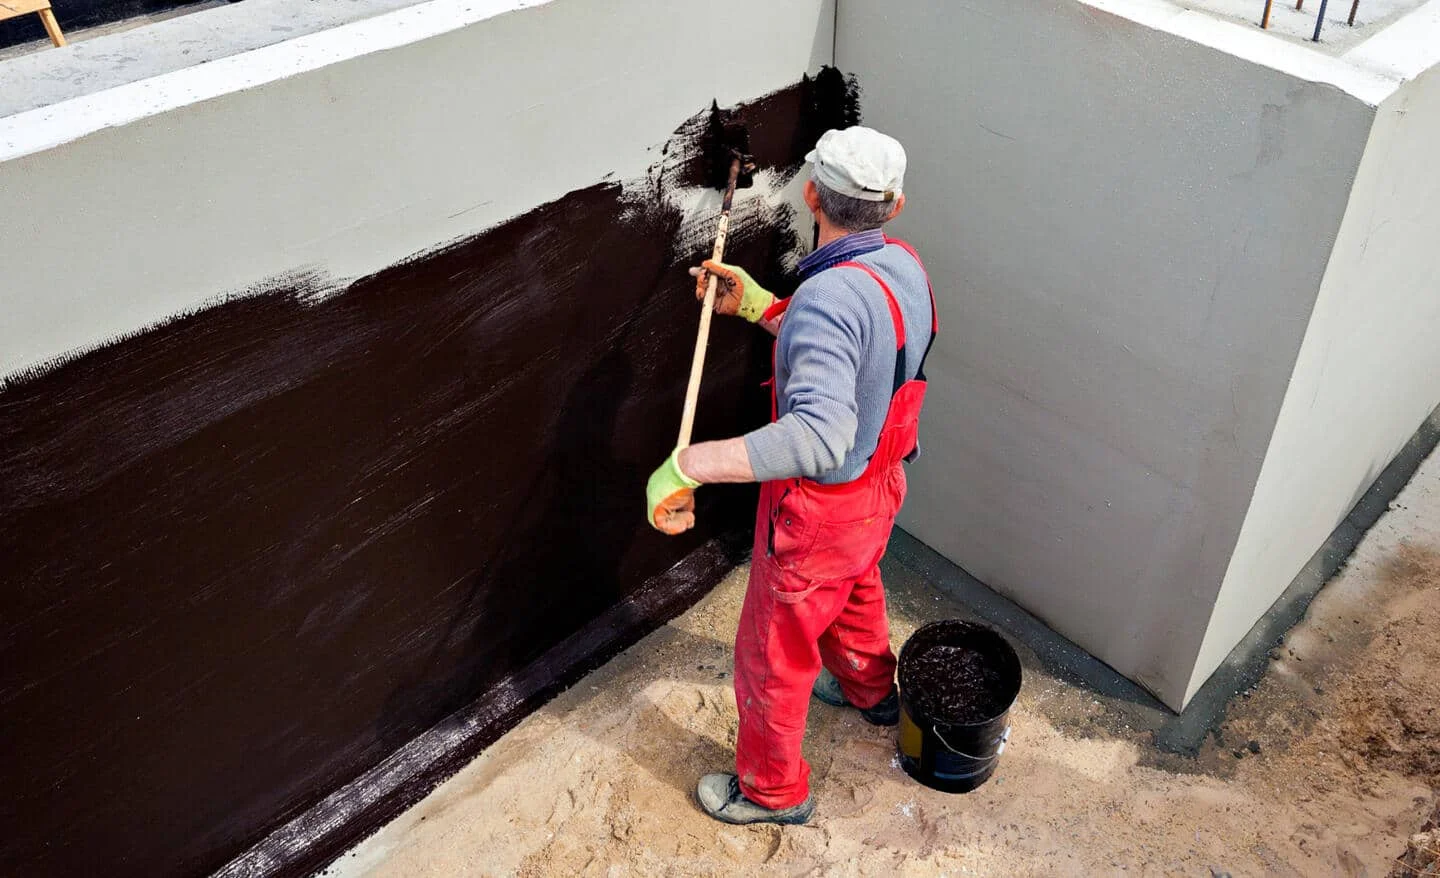
Applying Waterproof Sealants and Coatings
Once your walls are clean and repaired, it’s time to apply the waterproof sealant. Choose a high-quality, proven waterproofing product designed specifically for basement walls. Stir the product well before use to ensure consistency. Apply the first coat carefully from top to bottom, covering every inch evenly. Allow this coat to dry for at least four hours before applying a second coat. The second layer should be allowed to cure fully for at least 24 hours before exposing the walls to any moisture or humidity. Following manufacturer instructions closely during this process not only prevents mistakes but ensures the coating forms a durable, water-resistant seal.
Installing Vapor Barriers and Drainage Systems
For additional protection, you might consider installing a vapor barrier on interior walls, especially in areas prone to high humidity. These barriers help reduce moisture vapor transmission through the basement walls. Outside the house, proper drainage systems such as French drains can divert water away from your foundation, alleviating pressure on basement walls. While these steps may require more effort, combining interior waterproofing with exterior drainage solutions provides a comprehensive approach to keeping your basement dry.
Additional Preventative Measures to Keep Your Basement Dry
Improving Exterior Drainage and Gutters
Water pooling around your foundation is a common culprit for basement moisture. Ensuring gutters are clean and functioning well is critical. Gutters should direct water far from your home’s foundation via downspouts. Consider installing extensions if needed. Proper maintenance helps prevent water from seeping into the soil near your basement walls, reducing the risk of leaks.
Maintaining Proper Grading Around Your Home
The landscape around your house plays a significant role in water flow. Ideally, soil should slope away from the foundation to guide rainwater away naturally. If you notice water standing near your foundation after rain, it might be time to regrade your yard. Adjusting the slope can prevent water from accumulating next to basement walls and mitigate long-term moisture problems.
Using Dehumidifiers and Ventilation Solutions
Even with waterproofing, some basements naturally retain moisture. Using a dehumidifier helps control humidity levels, discouraging mold growth. Alongside mechanical solutions, improving basement ventilation can also make a big difference. Vent fans or opening windows when weather permits helps circulate air, keeping your basement environment dry and fresh.
Common Mistakes to Avoid During DIY Waterproofing
DIY basement waterproofing can be rewarding, but it’s easy to make errors that undermine your efforts. One of the biggest mistakes is skipping a thorough moisture assessment before starting. Without understanding the problem, you might apply waterproofing in the wrong areas or miss underlying issues. Using low-quality or unsuitable products often leads to failure within months.
Many homeowners overlook surface preparation, applying sealants over dirty or damaged walls, which weakens adhesion. Ignoring manufacturer guidelines—especially drying times between coats—or applying waterproofing on walls that are too damp without a bonding primer causes poor results. Safety is another area often neglected; protective gloves, goggles, and proper ventilation are essential to avoid health risks. Lastly, failing to monitor your basement regularly after waterproofing means you might miss new leaks or moisture problems emerging early.
By carefully assessing your basement, choosing the right materials, preparing surfaces properly, and following application guidelines, you can successfully waterproof your basement walls. Taking preventative measures around your home and maintaining vigilance afterward will keep your basement dry and healthy for years to come.

