Understanding the Basics of Pan Seared Steak
Pan searing steak is both an art and a science, one that can transform a simple cut of meat into a restaurant-quality dish right at home. Getting it right requires understanding the fundamentals of the technique. It’s not just about throwing a steak on a hot pan but about knowing your steak’s characteristics and how heat interacts with the meat to create flavor and texture.
Choosing the Right Cut for Pan Searing
Not all steaks are created equal when it comes to pan searing. Cuts like ribeye, strip steak, filet mignon, and sirloin work exceptionally well because they have a good balance of tenderness and fat. The fat within these steaks helps develop a rich crust and keeps the meat juicy under high heat.
Lean cuts tend to dry out faster and may not brown as nicely. Selecting a cut with some marbling—those streaks of fat running through the meat—makes a significant difference in flavor and moisture retention during cooking.
Importance of Steak Thickness and Marbling
Thickness plays a crucial role in how long it takes to cook a steak and how well you can control the internal doneness without overcooking. A steak around 1 to 1.5 inches thick is ideal for pan searing. This size allows for a well-developed crust while maintaining a tender, juicy interior.
Marbling, the intramuscular fat, melts into the meat as it cooks, enhancing its juiciness and flavor. Steaks with good marbling require careful attention during cooking to avoid rendering too much fat or burning it, which can lead to bitter taste.
Preparation Techniques Before Cooking
Bringing Steak to Room Temperature
One simple, often overlooked step is letting your steak rest at room temperature before cooking. Cold meat placed directly on a hot pan can cook unevenly, causing the outside to char before the center reaches the desired doneness.
Allowing the steak to sit out for about 30 minutes helps it cook more evenly. This step reduces the temperature gap between the surface and the center, minimizing the risk of overcooking the edges while waiting for the inside to heat through.
Seasoning: Timing and Methods for Maximum Flavor
Seasoning is more than just sprinkling salt and pepper. The timing can affect how well the flavors penetrate the meat. While some prefer seasoning their steak right before it hits the pan for a fresh crust, others find salting it 40 minutes to an hour in advance draws out moisture that then reabsorbs, creating a better sear.
Whatever method you choose, keep it simple to let the natural steak flavor shine. Salt and freshly ground black pepper are usually enough, but you can add garlic powder or herbs if desired. Patting the steak dry with a paper towel before seasoning ensures a crispier crust.
The Ideal Cooking Environment
Selecting the Best Pan and Heat Source
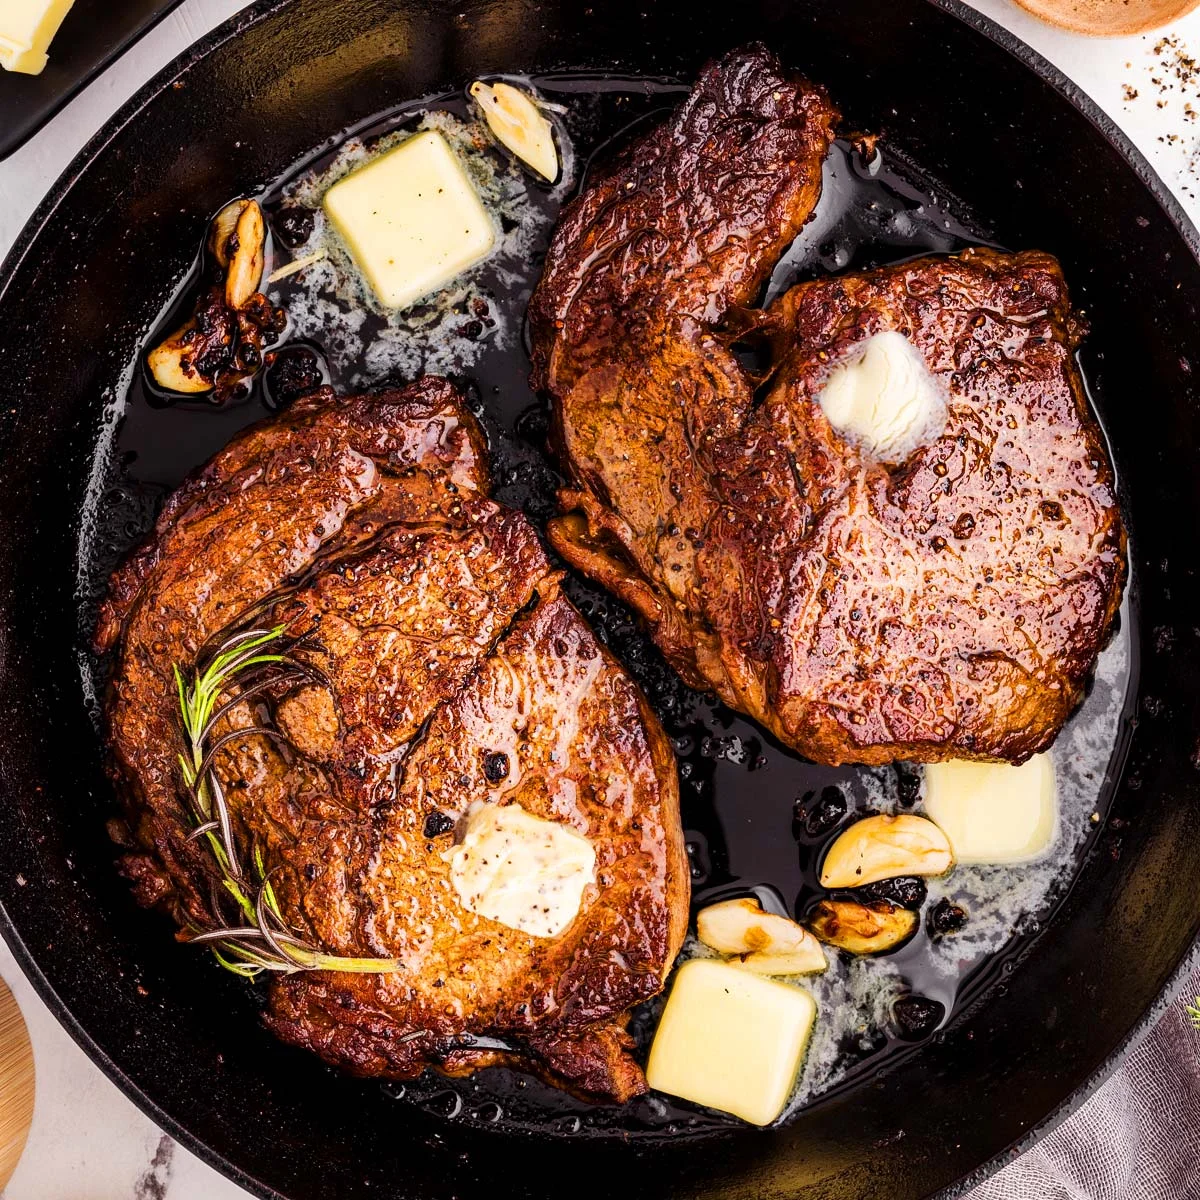
The pan you choose can make or break your pan seared steak. Heavy-bottomed pans like cast iron or stainless steel are perfect because they retain and distribute heat evenly, promoting that all-important crust.
Using the right heat source matters just as much. Medium-high heat is generally ideal. Too low, and the steak will cook slowly and lose moisture. Too high, and the outside can burn before the inside is properly cooked. Achieving a consistent heat level is key to controlling the cooking process.
Using Oil and Butter Correctly
Oil is necessary to prevent sticking and to help conduct heat. Choose oils with a high smoke point, such as canola, grapeseed, or avocado oil. Adding butter towards the end of cooking adds flavor but be careful not to add it too early, as it can burn under high heat.
Some chefs like to baste the steak with melted butter and aromatics during the final minutes, which enhances the richness and aroma without risking burning the butter early on.
Step-by-Step Cooking Process
How to Achieve the Perfect Sear
Start by heating your pan until it’s smoking hot, then add oil. Place your steak away from you to avoid splatters and don’t move it immediately. Let it cook undisturbed for a couple of minutes to form that golden-brown crust, which is a sign of the Maillard reaction creating deep flavor.
A good sear should be dark brown but not blackened. This initial crust locks in juices and builds texture. Resist the temptation to poke or prod the steak; patience here pays off.
Timing and Flipping: When and How Often
Flipping the steak too often can prevent a proper crust from forming and can lead to uneven cooking. Most experts suggest flipping only once, halfway through the cook time. This ensures even heat exposure on both sides and develops a beautiful crust uninterrupted.
The exact timing depends on steak thickness and preferred doneness, but 3-5 minutes per side is a good starting point for a medium-rare steak around 1 inch thick.
Understanding Doneness Levels and Internal Temperatures
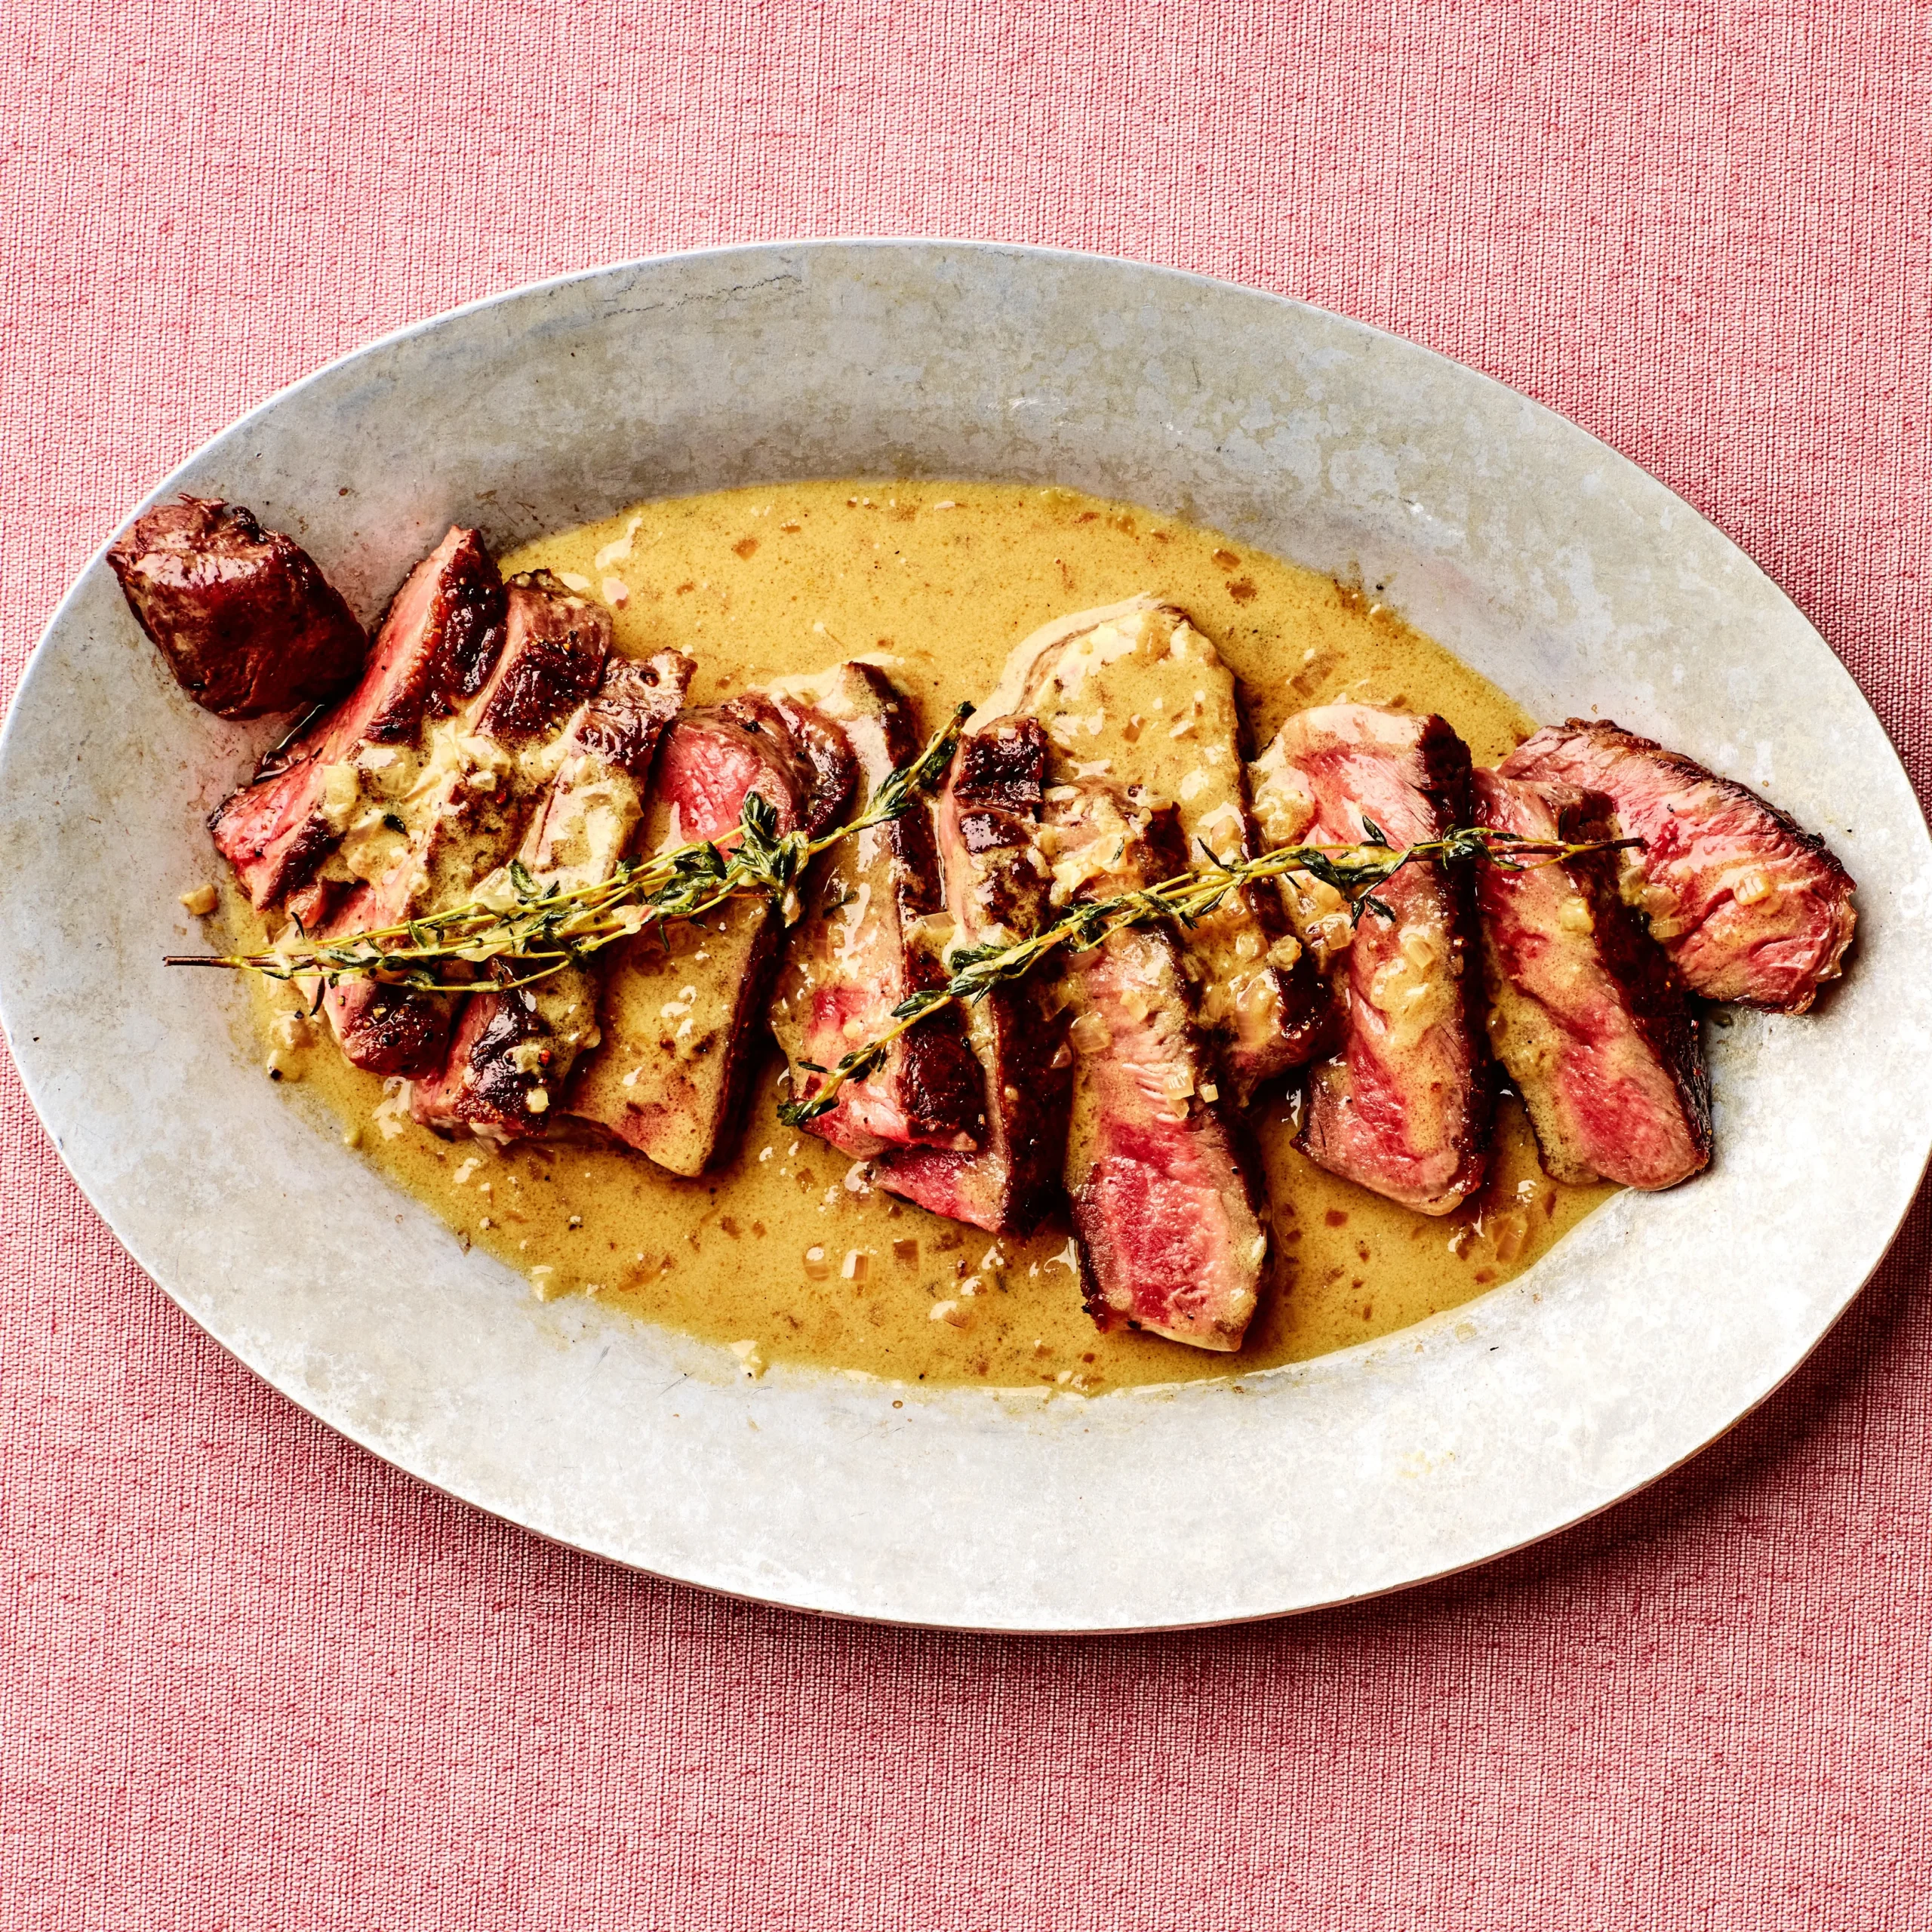
To avoid overcooking, trust the use of a meat thermometer. Getting familiar with internal temperatures for different doneness levels helps take out the guesswork. For example, rare is about 120-125°F, medium-rare 130-135°F, and medium 140-145°F.
Remove the steak from the pan slightly before it reaches your target temperature since residual heat will continue to cook it while resting. Understanding this carryover cooking step is crucial to preventing overdone meat.
Post-Cooking Tips
Resting Your Steak to Retain Juices
Resting the steak is arguably as important as the cooking itself. Letting the steak sit for 5-10 minutes after cooking allows juices to redistribute throughout the meat, making every bite tender and flavorful.
Cutting into the steak too soon causes those flavorful juices to spill out, resulting in a dry experience. Tent the steak loosely with foil during resting to keep it warm.
Carving and Serving Suggestions
Proper carving enhances the eating experience. Always slice against the grain to shorten the muscle fibers and make the steak easier to chew. Serving with a simple sauce, compound butter, or fresh herbs can elevate the dish without overpowering the steak’s natural taste.
Pairing your steak with classic sides like roasted vegetables or mashed potatoes rounds out a satisfying meal.
Common Mistakes to Avoid When Pan Searing Steak
Overcrowding the Pan
Trying to cook multiple steaks in a small pan at once can lead to steaming rather than searing, as the temperature drops drastically. This prevents the development of a proper crust and negatively affects texture.
Cook in batches if necessary, allowing the pan to return to temperature between steaks. This approach preserves that ideal sear and even cooking.
Using Too High or Too Low Heat
Heat control is tricky but essential. Too high heat can burn the steak’s exterior while leaving the inside undercooked. Conversely, too low heat leads to a grey, pale steak without a crust and drying out the meat.
Moderate heat with careful monitoring is best. Adjust as needed, especially if your pan heats unevenly or your stove fluctuates in power.
Tools and Technology to Help Avoid Overcooking
Thermometers and Other Cooking Gadgets
A reliable meat thermometer is a game-changer. Instant-read thermometers let you quickly check the steak’s temperature without lengthy guesswork. Some advanced models even offer wireless connectivity for constant monitoring.
Other useful tools include splatter guards to keep your cooking area clean and heavy pans that hold and distribute heat uniformly.
Apps and Timers for Precision
Smartphone apps designed for cooking can guide you through timing and temperature settings based on your steak’s thickness and desired doneness. Timers are simple but effective in reminding you when it’s time to flip or remove the steak.
Combining traditional techniques with modern technology can help you nail the perfect pan seared steak every time, avoiding the common pitfalls of overcooking and uneven results.

