Understanding Drywall Cracks: Causes and Diagnosis
Common Types of Drywall Cracks
Drywall cracks frequently appear as hairline fissures, jagged lines, or wider separations. They can be caused by natural settling of a house, temperature fluctuations, or moisture exposure. Recognizing the crack type is essential for determining the right repair approach.
How to Identify Structural vs. Cosmetic Cracks
Structural cracks often signal foundation or framing issues and tend to be wider, uneven, or accompanied by other signs like doors that stick. Cosmetic cracks are usually superficial surface imperfections caused by drywall shrinkage or minor settling. Repair methods vary significantly between these two categories.
Essential Tools and Materials for Drywall Repair
Must-Have Tools for DIY Repairs
Successful drywall repair requires a few key tools. A quality putty knife and a drywall knife, especially a 6-inch size for wider cracks, help apply compound evenly. Sanding sponges with fine grit ensure a smooth finish. Having a mud pan supports clean and efficient compound mixing or application.
Choosing the Right Joint Compound and Tape
Using just joint compound or spackling is insufficient as cracks often resurface. Fiberglass mesh drywall tape is crucial to reinforce and stabilize the repair. Products like 3M Patch Plus Primer combine spackling and primer benefits, streamlining the process and preventing repeated cracking.
Step-by-Step Guide: Repairing Small Cracks
Preparation and Surface Cleaning
Begin by cleaning the crack and surrounding wall area, removing loose debris or dust. This ensures better adhesion. If the crack is narrow, simply widening it slightly can help compound grip more effectively.
Filling, Sanding, and Finishing Techniques
Apply fiberglass mesh tape over the crack before spackling. Use the drywall knife to spread Patch Plus Primer starting from the tape center, dragging downward then upward. This technique stretches the tape and avoids wrinkles. Let the patch dry for about 30 minutes before sanding softly with a fine grit sponge. The compound feathered edge blends seamlessly with the wall, and no primer coat is needed before painting.
Tackling Large or Deep Cracks: Advanced Methods
Applying Reinforcement Mesh and Multiple Compound Layers
For cracks between 2 to 5 feet, start by applying fiberglass mesh tape over the entire length. Use a 6-inch drywall knife to spread a generous layer of Patch Plus Primer in a mud pan for easier handling. Multiple thin layers are preferable to one thick application, allowing each to dry fully before sanding gently. This layering increases durability and reduces the chance of cracking reappearing.
Tips for Ensuring Durability and Preventing Recurrence
Applying slightly more pressure with the knife edge touching the drywall helps feather the compound edges, blending the repair flawlessly. Be sure the Patch Plus Primer container is sealed and fresh to avoid compromised product quality. Proper drying time is critical; rushing leads to poor adhesion and cracks returning.
Visual Showcase: Before and After Repair Projects
Photo Case Study 1: Minor Crack Repairs
Small cracks with minimal wall damage respond well to a single application of fiberglass tape and Patch Plus Primer. The before photos show thin, spiderweb-like cracks, while the after images reveal smooth, invisible repairs blending perfectly with the existing wall surface.
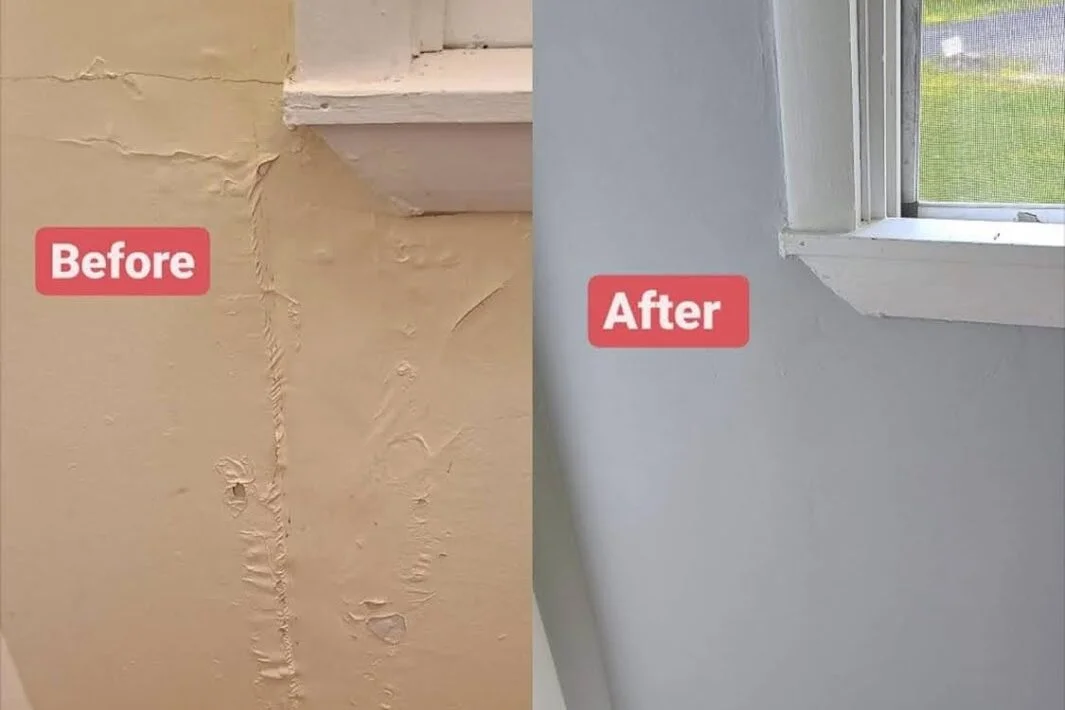
Photo Case Study 2: Repairing Major Wall Damage
Large cracks and areas affected by wall shifting require reinforced mesh and multiple compound layers. The before shots capture wide, jagged fissures, often with loose drywall pieces. After careful layering, sanding, and finishing, the damage is no longer visible, restoring both wall integrity and aesthetic.
Preventative Tips to Avoid Future Drywall Cracking
Home Maintenance and Environmental Controls
Controlling humidity levels inside your home can reduce drywall stress. Use dehumidifiers in damp areas and ensure proper ventilation. Regularly inspect for foundation shifts or leaks that could cause uneven settling or water damage leading to cracks.
When to Consult a Professional Contractor
If cracks reappear after repairs or grow wider over time, it may indicate deeper structural problems. Professional assessment ensures accurate diagnosis and appropriate remediation. Early intervention can prevent costly damage and maintain home safety.

